Monday, August 26, 2013

Free Crochet Pattern - Football Beanie Chemo Hat

Free Crochet Pattern - Football Beanie Chemo Hat


I've had a couple people ask me for a beanie version of the Slouchy Football Hat.  Originally I wrote the pattern as a beanie but then revised it for the slouchy version.  I just found the original beanie version, so here it is.  It's written for one size only.  If you can do a little math, you can adjust this pattern to fit just about any head size.

Math Lesson
Circumference = 3.141592 X diameter

Please note, this pattern is copyrighted and may not be reproduced or redistributed. Completed hats may NOT be sold as the distribution of this free pattern is to promote awareness of the need for fun children’s chemo hats. Feel free to make as many as you like for personal use or for charity.   Please don't sell completed items from my free patterns as they are written to help promote charity, not for the profit of others.  There are plenty of independent designers (myself included) who allow completed items to be sold from their commercial patterns.

For more information and where to donate, please go to www.halosofhope.org


Exact gauge is not especially important. If your diameter is 6-6.5 inches, you hat will fit most kids 5 years old to teen. An average 5 year old boy’s head circumference is 19.68 inches and an average 9 year old boy’s head is 20.75 inches. A hat with a diameter of 6 inches will yield a hat of approximately 18.85 inches in circumference, 6.25 inch diameter will yield a circumference of 19.63 inches and a 6.5 inch diameter will yield a hat with a circumference of 20.42 inches. Hats should be about 1 inch less than the desired head circumference. For this style hat you may want to try to get your diameter to 6-6.25 inches for the younger heads. But if it is 6.5 inches, I’m sure a child will fit into it. My just turn 9 year old son has a head circumference of 21.25 inches, a good half inch larger than average and he likes his hats loose.

If you like the pattern and want to see more, either subscribe to this blog via RSS or sign up for automatic email updates-see the sidebar.  LIKE on Facebook for even more!  Join the Crochet by Darleen Hopkins Newsletter http://crochetbydarleenhopkins.com/newsletter/.

YARN/NOTIONS
  • Bernat Cottontots, 100% cotton,1 skein County Taupe/brown ,1 skein white  
  • Stitch marker 
CROCHET HOOK: H/8 (5.00 mm) hook or size needed to obtain correct gauge 
SKILL LEVEL: Easy
FINISHED MEASUREMENTS: approximate 18 3/4" to 20 ½" circumference, 7 1/4" in length
Hat is worked in a continuous spiral, do not join rounds. Mark the beginning of each round.
Brown yarn and H hook
Round 1) With magic loop method , 8 sc into loop. Tighten.
Round 2) 2 Hdc in each sc around. (16 stitches)
Round 3) * Hdc in next, 2 hdc in next; repeat from * 7 more times around. (24 stitches)
Round 4) * Hdc in next 2, 2 hdc in next; repeat from * 7 more times around. (32 stitches)
Round 5) * Hdc in next 3, 2 hdc in next; repeat from * 7 more times around. (40 stitches)
Round 6) * Hdc in next 4, 2 hdc in next; repeat from * 7 more times around. (48 stitches)
Round 7) * Hdc in next 5, 2 hdc in next; repeat from * 7 more times around. (56 stitches)
Round 8) * Hdc in next 6, 2 hdc in next; repeat from * 7 more times around. (64 stitches)
Check diameter should be between 6" and 6 1/2"
Round 9) Change to white yarn but do not break off brown yarn, just pick it back up on round 10, *hdc in next hdc; repeat from * around. Break off white yarn and change to brown yarn. (64 stitches)
Rounds 10)-19) *Hdc in next hdc; repeat from * around. Change to white yarn but do not break off brown yarn, just pick it back up on round 20. (64 stitches)
Round 20) With white yarn, *hdc in next hdc; repeat from * around. Break off white yarn and change to brown yarn. (64 stitches)
Round 21) With brown yarn *hdc in next hdc; repeat from * for 60 stitches, sc, sc, slip stitch, slip stitch. Break off yarn and work in ends. (64 stitches)
Keeping color change joins in the back, hand stitch on the front of the hat the football lacing using the photo as a guide.  Enjoy!


Friday, August 9, 2013

Free Crochet Pattern - Snowflake Ice Scraper Mitt

Free Crochet Pattern - Snowflake Ice Scraper Mitt

This pattern is a great way to use an old damaged wool sweater.  Felt it and cut the front and back to the appropriate size.  Don’t have an old sweater available?  Look at your local thrift store for a hidden treasure.  Or you could crochet the pieces.  Most wool shrinks by 20%-30% when felted.  Crochet two rectangles in half double crochet that is at least 16” X 13” and then felt it.  Trim it to the appropriate size as stated in the pattern.  Want to learn more about felting?  See this blog post for information about how to felt.  It's easy, it's fun, it's inexpensive and a great way to repurpose something old into something new and useful.

Please note, this pattern is copyrighted and may not be reproduced or redistributed.

Want to be the first to hear about new FREE patterns by Darleen?  Sign up for email notification (see sidebar) or subscribe via RSS feed.  Don't forget to LIKE for Facebook updates, crochet fun and coupon codes. Join the Crochet by Darleen Hopkins Newsletter http://crochetbydarleenhopkins.com/newsletter/.

FINISHED SIZE: Mitt-11” X 9”, Snowflake-6” point to point.

SUPPLIES: Worsted weight 100% wool yarn or substitute any feltable worsted weight yarn
   F/ 5 3.75mm hook
   Two pieces of felted wool trimmed to 11” X 9” (perfect use of an old wool sweater)
   Ice scraper

GAUGE: Not important

SKILL LEVEL: Easy/Intermediate; requires concentration

NOTES: Pattern is written using standard US stitches.
sl st = slip stitch
ch  = chain
sc = single crochet
magic circle/adjustable ring = see this photo tutorial: http://crochetbydarleenhopkins.com/2013/01/23/magic-circle-aka-adjustable-ring-how-to/

Snowflake

Center Ring-unless otherwise noted, work in a continuous spiral, do not join rounds.  Mark the beginning of each round.

1) Using magic circle/adjustable ring method, work 8 sc in loop.  Tighten.

2) * Sc in next sc, 2 sc in next sc; repeat from * 3 more times around. (12 stitches total)

Snowflake Point-first you will work the length of the point by chaining and working loops (Steps 1 - 4).  Then you will work back down the same chain by slip stitching into the chain and working loops on the opposite side of the loops already made (Steps 5 - 12). 

Note-be careful not to twist the chain and keep the loops to your right (left if left-handed).

Step 1) Sc in next stitch, ch 9, sl st in 6th chain from hook.  Loop (A) made.

Step 2) Ch 9, sl st in 6th chain from hook.  Loop (B) made.

Step 3) Ch 11, sl st in 8th chain from the hook.  Loop (C) made.

Step 4) Ch 6, sl st in both the slip stitch and the chain from loop (C).  See photo X.

Step 5) Working back down the chain, sl st in the next 3 chains.

Step 6) Sl st in both the slip stitch and the chain from loop (B).  See photo X.

Step 7) Ch 4, slip stitch in just the chain from loop (B).  See photo Y.

Step 8) Working back down the chain, sl st in the next 3 chains.

Step 9) Sl st in both the slip stitch and the chain from loop (A).  See photo X.

Step 10) Ch 4, slip stitch in just the chain from loop (A).  See photo Y.

Step 11) Working back down the chain, sl st in the next 3 chains.

Step 12) Sc in next stitch on the center ring.

Starting from Step 1, repeat 5 more times.  End with a sl st in the first sc from the first point. 
(6 snowflake points, 6 sc)

Photo X


Photo Y


 Assembly


Block the snowflake.  Sew the snowflake onto the first piece of felt. 
Place the two pieces of felt together (snowflake on top), and starting in the upper right corner, whip stitch down the first side of the mitt, sewing the two pieces together.  Turn the corner and continue whip stitching the two pieces together for 3 ½”.  Leave a 2” opening in the middle for the ice scraper (continue adding decorative stitching to one side) then finish whip stitching the bottom 3½” together.  Turn the corner and whip stitch the second side together.  Turn the last corner and whip stitch the first 1½” together.  Continue adding decorative stitching to one side of the felt for 6”.  This is the arm opening.  Whip stitch the last 1½” together.   Break off yarn.  Last, add decorative stitching to the two opening sides that were previously skipped. 
Enjoy!

Free Crochet Pattern - Party Hat

Free Crochet Pattern - Character Hat Party Hat


by Darleen Hopkins
Please note, this pattern is copyrighted and may not be reproduced or redistributed.  Feel free to make as many as you like for personal use or for charity.  I ask that my free patterns not be used for profit as they are designed with charity in mind.  There are plenty of for sale patterns available from independent designers (myself included) who give permission to sell items completed from their patterns.

Make every hat a Party Hat! Add this party hat to any character hat and you’ll be guaranteed smiles.

Some may wonder....Why a Party Hat for a Hat???

Halos of Hope was collecting Party Themed hats for a special camp. I decided to make some Party Animals and designed this quick add on. Great use of some leftover yarn. Decorate it with buttons, French knots, ribbons, pompoms-anything- stuff with some poly-fiber fill and sew it on your favorite character hat. PARTY ON DUDE!

Quick and easy pattern for you to decorate as you like.

This FREE pattern is for the hat add on only. Patterns for the ADORABLE Pig and Frog Hats available here: http://crochetbydarleenhopkins.com/patterns/hat-pig-oink-oink/
(Pattern for the Frog Hat is INCLUDED with the Pig Hat!)

Want to be the first to hear of new FREE Crochet by Darleen Hopkins patterns?  Sign up for RSS feed or email updates-see the sidebar.  Facebook users, LIKE for crochet fun, coupon codes and updates.  Join the Crochet by Darleen Hopkins Newsletter http://crochetbydarleenhopkins.com/newsletter/.

YARN/NOTIONS: 
Worsted weight yarn for main color
Small amount contrast colors
Stitch marker
Poly-fiberfill

CROCHET HOOK: 
H/8 (5.00 mm) or size needed to obtain correct gauge

GAUGE:  If you are using standard worsted weight yarn, your hat should work out to approximately the same finished size.    Gauge on Party Pig’s hat, 6 stitches = 2” 6 rows = 2”

SKILL LEVEL: Easy +

NOTES:  Pattern is written using US standard terms. 

The hat is worked in a continuous spiral, do not join rounds.

Mark the beginning of each round.

ch=chain
sl st = slip stitch
sc = single crochet
hdc = half double crochet
FPdc = front post double crochet
magic circle/adjustable ring = See photo tutorial here: http://crochetbydarleenhopkins.com/2013/01/23/magic-circle-aka-adjustable-ring-how-to/

Finished size, approximately 6” tall.

1)  Using magic circle/adjustable ring method, ch 1 then work 6 sc into loop.  Tighten.

2)  Hdc in each sc.  (6 stitches)

3)  * Hdc in next 2 stitches, 2 hdc in next stitch; repeat (8 stitches)

4) Hdc in each stitch.  (8 stitches)

5)  * Hdc in next stitch, 2 hdc in next stitch; repeat from * 3 more times around. (12 stitches)

6)  Hdc in each stitch.  (12 stitches)

7)  * Hdc in next 2 stitches, 2 hdc in next stitch; repeat from * 3 more times around. (16 stitches)

8)  Hdc in each stitch.  (16 stitches)

9)  * Hdc in next 3 stitches, 2 hdc in next stitch; repeat from * 3 more times around. (20 stitches)

10)   Hdc in each stitch.  (20 stitches)

11)   * Hdc in next 4 stitches, 2 hdc in next stitch; repeat from * 3 more times around.
(24 stitches)

12)   Hdc in each stitch.  (24 stitches)

13)   * Hdc in next 5 stitches, 2 hdc in next stitch; repeat from * 3 more times around.
(28 stitches)

14)   Hdc in each stitch.  (28 stitches)

15)   * Hdc in next 6 stitches, 2 hdc in next stitch; repeat from * 3 more times around.
(32 stitches)

16)   Hdc in each stitch.  (32 stitches)

17)   * Hdc in next 7 stitches, 2 hdc in next stitch; repeat from * 3 more times around.
(36 stitches)

18)   Hdc in each stitch.  (36 stitches)

19)   * Hdc in next 8 stitches, 2 hdc in next stitch; repeat from * 3 more times around.
(40 stitches)

20)   Hdc in each stitch.  (40 stitches)

21)   Sl st in next stitch, ch 2.  The remaining stitches will be worked around the post of each hdc
 from round 20. *3 FPdc in first stitch; repeat from * 39 more times around.  Sl st into ch 2.
(120 stitches)

MAKE IT FUN!
• Add buttons or French knots
• Tassels, pompoms or bells
• Change yarn colors every other row to create stripes. 
• You can create vertical stripes/swirls with surface stitches

Stuff with poly-fiberfill, attach party hat to character hat with whip stitches and work in ends. ENJOY!

Wednesday, August 7, 2013

Free Crochet Pattern - Spring Blossoms Hair Clips

Free Crochet Pattern - Spring Blossoms Hair Clips

I came up with these flower hair clips when I was making a Christmas gift for my 9-year-old niece. I made her a hat and scarf set and wanted to make something else with the leftover yarn. They are quick and easy and can be used to decorate anything. Check out this post where I added them to a hat for a brave little girl fighting cancer.

Please note, this pattern is copyrighted and may not be reproduced or redistributed.  Feel free to make as many as you like for personal use or for charity.  I ask that my free patterns not be used for profit.  There are plenty of for sale patterns available from independent designers (myself included) who give permission to sell items completed from their patterns. 

Sign up for RSS feed or email updates (see sidebar) and be the first to hear about new FREE Crochet by Darleen Hopkins patterns.  Also, if you are a Facebook users, please LIKE for coupon codes, crochet fun and additional updates.  Join the Crochet by Darleen Hopkins Newsletter http://crochetbydarleenhopkins.com/newsletter/.

DIFFICULTY: Easy

FINISHED SIZE: Approximately 1 ½ – 2 inches

MATERIALS:

Worsted weight yarn, approximately 1 yard of color A (middle); 3 yards of color B (petals)

I (5.5mm) hook

Yarn needle

Hair Clip

Thread-invisible or match to color A


NOTES: Pattern is written using standard US stitches.

ch=chain

sl st= slip stitch

sc = single crochet

hdc = half double crochet

dc = double crochet

magic circle/adjustable ring see picture tutorial


PATTERN:

Petal= in same stitch [sl st, hdc, dc, hdc, sl st]

1) Color A and I hook.

With magic circle/adjustable ring method, ch 1 then work 7 sc into ring. Join with a sl st. Tighten and break off yarn.

2) Attach color B at any stitch, ch 1 and in same stitch, hdc, dc, hdc, sl st. Work Petal in next 6 stitches. Break off yarn.


FINISHING:

Work in ends. Sew flower to hair clip with matching or invisible thread. Make sure it is securely attached. Enjoy!

Free Crochet Pattern - Seeing Stars Applique

Free Crochet Pattern - Seeing Stars

 I've been seeing stars lately. Halos of Hope is once again working with Valerie Fund's Camp Happy Times to provide themed hats for a get-away camp for children who are survivors of cancer. This year's theme is "Stars". So I've had stars on the brain trying to come up with some unique designs to fit this theme. Sometimes though, the best solution is the most obvious-how about a star appliqued on a basic hat? This solution came real obvious to me this AM. I was organizing what is left of my Cotton Tots yarn for my Stash Bust Challenge 2013, and out popped this cute little star I worked up a couple of years ago. I had forgotten all about it. So I've spent the afternoon re-creating the star and a making it a little better. I hope you like this cutie. I have some dark purple Lion Brand CottonEase in my stash. I plan to make a hat, probably use my Candy Corn Pattern without the earflaps and all in one color, and sew a bunch of these stars on it for a wizard-like look. I'll post a photo when it's complete. If you are on Ravelry, please link up anything you use the stars on.

Please note, this pattern is copyrighted and may not be reproduced or redistributed. 

Feel free to make as many stars as you like for personal use or for charity.  I ask that my free patterns not be used for profit as they are designed with charity in mind.  There are plenty of for sale patterns available from independent designers (myself included) who give permission to sell items completed from their patterns.

Want more FREE Crochet by Darleen Hopkins patterns?  Sign up for RSS feed or instant email updates and be the first to know when new pattern is published.  On Facebook?  LIKE for even more information and general crochet fun.  Join the Crochet by Darleen Hopkins Newsletter http://crochetbydarleenhopkins.com/newsletter/.


Yarn: Approximately 4-5 yards of any yarn.  I used Lion Brand CottonEase (worsted) in Maize

Hook: Appropriate size for yarn.  I used an H/5.0mm

Notes:  Uses standard US stitches.  Star is worked in the round.  Each tip is made while crocheting the 2nd round.  If necessary, block to keep tips from curling.  When attaching the star, tack the middle and each tip to help keep flat.
  • ch – chain
  • sl st – slip stitch
  • sc - single crochet
  • hdc - half double crochet
  • dc – double crochet
  • tr – treble crochet
Round 1) With magic circle/adjustable ring (see photo tutorial) method work 10 sc in loop, tighten and join with sl st.

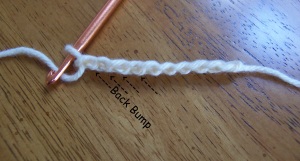
Round 2) * Ch 5 and working in the back bump only (see below) sc in 2nd ch from hook, hdc, dc, tr, skip next sc, sl st; repeat from * 4 more times ending with a sl st join to the 1st in the round.  Break off yarn leaving a long tail to attach star to item.

Working in the back bump

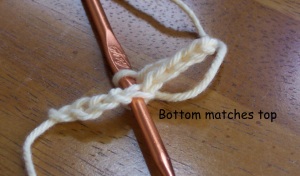
If you flip a chain over, you’ll see a bump on the reverse side.  If you work your stitches into it, you’ll end up with a nice edge on both sides of the star point. See this page for a video on this method.
backbumps (2)bottommatchestop (2)

Free Crochet Pattern - Slouchy Football Hat, Toddler to Adult

Free Crochet Pattern - Slouchy Football Hat

Everyone loves football, well, most everyone.  Whether you love football from the field, the stands, or the couch, you can show your love of the sport with this adorable hat-Slouchy Style.  Sized to fit most in your family, toddler to adult.

This hat will also make a fun hat for all football fans - kids, teens and adults - going thru chemo treatments.  Halos of Hope is a fantastic group that collects donated handmade hats and distributes them to chemo centers around the US.  Check them out at HalosofHope.org.

Feel free to make as many as you like for personal use or for charity.  I ask that my free patterns not be used for profit as they are designed with charity in mind.  There are plenty of for sale patterns available from independent designers (myself included) who give permission to sell items completed from their patterns.

Please note, this pattern is copyrighted and may not be reproduced or redistributed. Completed hats may NOT be sold as the distribution of this free pattern is to promote awareness of the need for fun children’s chemo hats. Please make one for Halos of Hope or another organization that collects and distributes kids’ chemo hats. For more information and where to donate, please go to www.halosofhope.org

You can see more pictures here: http://www.ravelry.com/patterns/library/slouchy-football-hat 


Facebook users, be sure to LIKE for crochet fun!  Be the first to hear about new, FREE Crochet by Darleen Hopkins patterns by signing up for RSS feed or email updates-see the sidebar. Join the Crochet by Darleen Hopkins Newsletter http://crochetbydarleenhopkins.com/newsletter/.

SIZE

Small-Toddler fits approximate 18-19” head circumference (average 9 months – 3 years)

Medium-Small Child fits approximate 19-20½” head circumference (3 years – 6 years)

Large-Tween/Teen/Adult fits approximate 20½-22” head circumference (6 years – adult)


FINISHED SIZE

Small – 17¼” unstretched circumference, 9” long
Medium – 18¾” unstretched circumference, 10” long
Large – 20¼” unstretched circumference, 11” long

MATERIALS

Lion Brand Cotton-Ease [50% cotton, 50% acrylic; 207 yd/188 m per 3.5 oz/100 g skein]; color: Hazelnut; #125 1 skein
Lion Brand Cotton-Ease [50% cotton, 50% acrylic; 207 yd/188 m per 3.5 oz/100 g skein]; color: Snow; #100 1 skein H/8 (5.00 mm) hook or size needed to obtain correct gauge Stitch markers Yarn needle

GAUGE

13 sts/10 rows = 4″ in hdc rows.  Take the time to make a gauge swatch.

NOTES

Pattern is written using standard US stitches.
sl st = slip stitch
ch  = chain
sc = single crochet
hdc = half double crochet
FBtr = front post treble crochet. Yarn over 3 times.  Insert hook around the post of the indicated stitch-from front to back and then out the front again.  Yarn over and pull through a loop. Yarn over and pull through 2 loops (3X).
Magic circle/adjustable ring

Small

Fits approximate 18-19” head circumference (9 months – 3 years)

The hat is worked in a continuous spiral, do not join rounds.

Mark the beginning of each round.

With brown yarn and H hook
1)  Using magic circle/adjustable ring method, ch 1 then work 8 sc into loop.  Tighten.

2)  Hdc in each sc.   (8 stitches total)

3)  2 Hdc in each stitch.  (16 stitches total)

4)  Hdc in each stitch.  (16 stitches total)

5)  * Hdc in next stitch, 2 hdc in next stitch; repeat from * 7 more times around.(24 stitches total)

6)  Hdc in each stitch.   (24 stitches total)

7)  * Hdc in next 2 stitches, 2 hdc in next stitch; repeat from * 6 more times around, hdc in next 2 stitches, 2 sc in next hdc changing to white yarn on the last stitch. (32 stitches total)
Do not break off the brown yarn you will pick it back up at the end of round 9.

8)   Sc, sc, hdc in next 30 stitches.  (32 stitches total)

9)  Hdc in next 30 stitches, sc, sc changing to brown yarn on the last stitch. Break off white yarn.  (32 stitches total)

10)   Sc, sc, hdc, 2 hdc in next stitch, * hdc in next 3 stitches, 2 hdc in next stitch; repeat from * 6 more times around.  (40 stitches total)

11)   Hdc in each stitch.  (40 stitches total)

12)  * Hdc in next 4 stitches, 2 hdc in next stitch; repeat from * 7 more times around. (48 stitches total)

13)   Hdc in each stitch.  (48 stitches total)

14)   * Hdc in next 5 stitches, 2 hdc in next stitch; repeat from * 7 more times around.
(56 stitches total)

15)  – 20)  Hdc in each stitch.  (56 stitches each round)

21)   Hdc in the next 54 stitches, sc, sc changing to white yarn on the last stitch. (56 stitches total)
Do not break off the brown yarn you will pick it back up at the end of round 23.

22)  Sc, sc, hdc in next 54 stitches.  (56 stitches total)

23)  Hdc in next 54 stitches, sc, sc changing to brown yarn on the last stitch. Break off white yarn.  (56 stitches total)

24)  Sc, sc, hdc in next 54 stitches.  (56 stitches total)

25) – 27)  Sc in each stitch.  (56 stitches each round)

28)  *Sc, skipping next sc work a FPtr around sc post from row 25; repeat from * 27 more times.  Sl st into first sc in round.  Break off brown yarn. (57 stitches; 28 sc, 28 FPtr, 1 sl st)
Keeping color change joins in the back, hand stitch the football lacing on the front of the hat.

Medium

Fits approximate 19 – 20½” head circumference (3 years – 6 years)
The hat is worked in a continuous spiral, do not join rounds.

Mark the beginning of each round.

With brown yarn and H hook
1)  Using magic circle/adjustable ring method, ch 1 then work 8 sc into loop.  Tighten.

2)  Hdc in each stitch.  (8 stitches total)

3)  2 Hdc in each stitch.  (16 stitches total)

4)  Hdc in each stitch.  (16 stitches total)

5)  * Hdc in next stitch, 2 hdc in next stitch; repeat from * 7 more times around. (24 stitches total)

6)  Hdc in each stitch.  (24 stitches total)

7)  * Hdc in next 2 stitches, 2 hdc in next stitch; repeat from * 7 more times around. (32 stitches total)

8)  Hdc in each stitch.  (32 stitches total)

9)  * Hdc in next 3 stitches, 2 hdc in next stitch; repeat from * 6 more times around, hdc in next 3 stitches, 2 sc in next stitch changing to white yarn on the last stitch. (40 stitches total)
Do not break off the brown yarn you will pick it back up at the end of round 11.

10)    Sc, sc, hdc in next 38 stitches.  (40 stitches total)

11)   Hdc in next 38 stitches, sc, sc changing to brown yarn on the last stitch. Break off white yarn.  (40 stitches total)

12)   Sc, sc, hdc, hdc, 2 hdc in next stitch, * hdc in next 4 stitches, 2 hdc in next stitch; repeat from * 6 more times around.  (48 stitches total)

13)   Hdc in each stitch.  (48 stitches total)

14)   * Hdc in next 5 stitches, 2 hdc in next stitch; repeat from * 7 more times around. (56 stitches total)

15)   Hdc in each stitch.  (56 stitches total)

16)  * Hdc in next 13  stitches, 2 hdc in next stitch; repeat from * 3 more times around. (60 stitches total)

17) – 23)  Hdc in each stitch.  (60 stitches each round)

24)  Hdc in the next 58 stitches, sc, sc changing to white yarn on the last stitch. (60 stitches total)
Do not break off the brown yarn you will pick it back up at the end of round 26.

25)  Sc, sc, hdc in next 58 stitches.  (60 stitches total)

26)  Hdc in next 58 stitches, sc, sc changing to brown yarn on the last stitch. Break off white yarn.  (60 stitches total)

27)  Sc, sc, hdc in next 58 stitches.  (60 stitches total)

28) – 30)  Sc in each stitch.  (60 stitches each round)

31)  *Sc, skipping next sc work a FPtr around sc post from row 28; repeat from * 29 more times.  Sl st into first sc in round.  Break off brown yarn. (61 stitches; 30 sc, 30 FPtr, 1 sl st)

Keeping color change joins in the back, hand stitch the football lacing on the front of the hat.

Large

Fits approximate 20½-22” head circumference (6 years – adult)

The hat is worked in a continuous spiral, do not join rounds.

Mark the beginning of each round.

With brown yarn and H hook.  Using magic circle/adjustable ring method, ch 1 then work 8 sc into loop.  Tighten.

1)  Hdc in each sc.

2)  2 Hdc in each stitch.  (16 stitches)

3)  Hdc in each stitch.

4)  * Hdc in next stitch, 2 hdc in next stitch; repeat from * 7 more times around. (24 stitches total)

5)  Hdc in each stitch.

6)  * Hdc in next 2 stitches, 2 hdc in next stitch; repeat from * 7 more times around. (32 stitches total)

7)  Hdc in each stitch.

8)  * Hdc in next 3 stitches, 2 hdc in next stitch; repeat from * 7 more times around. (40 stitches total)

9)   Hdc in each stitch.

10)  * Hdc in next 4  stitches, 2 hdc in next stitch; repeat from * 6 more times around,
hdc in next 4 stitches, 2 sc in next stitch changing to white yarn on the last stitch. (48 stitches total)
Do not break off the brown yarn you will pick it back up at the end of round 12.

11)   Sc, sc, hdc in next 46 stitches.  (48 stitches total)

12)   Hdc in next 46 stitches, sc, sc changing to brown yarn on the last stitch. Break off white yarn.  (48 stitches total)

13)   Sc, sc, hdc, hdc, hdc, 2 hdc in next stitch, * hdc in next 5 stitches, 2 hdc in next stitch; repeat from * 6 more times around.  (56 stitches total)

14)   Hdc in each stitch.

15)  * Hdc in next 6  stitches, 2 hdc in next stitch; repeat from * 7 more times around. (64 stitches total)

16) – 26)  Hdc in each stitch.  (64 stitches each round)

27)  Hdc in the next 62 stitches, sc, sc changing to white yarn on the last stitch.
(64 stitches total) Do not break off the brown yarn you will pick it back up at the end of round 29.

28)  Sc, sc, hdc in next 62 stitches.  (64 stitches total)

29)  Hdc in next 62 stitches, sc, sc changing to brown yarn on the last stitch. Break off white yarn.  (64 stitches total)

30)  Sc, sc, hdc in next 62 stitches.  (64 stitches total)

31) – 33)  Sc in each stitch.  (64 stitches each round)

34)  *sc, skipping next sc work a FPtr around sc post from row 31; repeat from * 31 more times. Sl st into first sc in round. Break off brown yarn. (65 stitches; 32 sc, 32 FPtr, 1 sl st)
Keeping color change joins in the back, hand stitch the football lacing on the front of the hat. ENJOY!