by Darleen Hopkins
 |
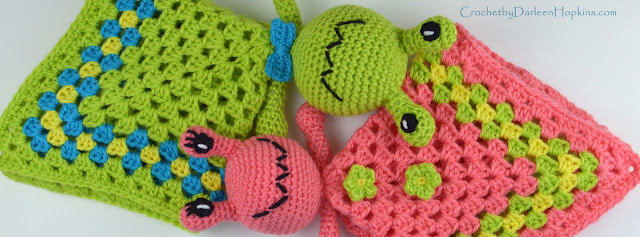
| Edging A |
 |
| Edging B |
 |
| Edging C |
**Please use cotton yarn for softness on tender skin.**
**Lion Brand CottonEase and Bernat CottonTots are great yarns for this project. Unfortunately, both have been discontinued. Use a similar, soft yarn in worsted weight for this project.**
**Red Heart Super Saver, although great for many projects, is NOT a good yarn for chemo hats.**
Check out Halos of Hope's Yarn Recommendations list.
Please note, this pattern is copyrighted and may not be reproduced or redistributed. Completed hats may NOT be sold as the distribution of this free pattern is to promote awareness of the need for fun children’s chemo hats. Please make one for Halos of Hope or another organization that collects and distributes kids’ chemo hats. For more information and where to donate, please go to www.halosofhope.org.
YARN/NOTIONS:
Lion Brand CottonEase, 50% cotton, 50% acrylic, 3.5 oz skein, or equivalent (worsted, 4)
1 skein Lime/green (main color)
Small amount white (eye color), black (eye color and mouth) and red (optional tongue)
Stitch marker
Small amount of poly-fiberfill
SKILL LEVEL: Easy. Must be able to work in the round.
CROCHET HOOKS:
I/9 (5.50 mm)
H/8 (5.00 mm) or size needed to obtain correct gauge
G/6 (4.25mm)
F/5 (3.75mm)
GAUGE: If your final diameter is 6-6½ inches, your hat will fit most kids 5 years old to teen. Hats should be about 1 inch less than the desired head circumference. 100% cotton yarns stretch less and may need to be made closer to actual head circumference. When measuring gauge/diameter, always place the tape measure at the last stitch made and then measure through the middle, directly across for an accurate measurement.
Circumference = 3.141592 X diameter
Use the following chart as a guideline:

SIZES:
Small/Medium: Fits approximate 19”-20½” head circumference (3 years-6 years)
Finished measurements ~ approximate 18¾” circumference, 7” length
Medium/Large: Fits approximate 20½”-22” head circumference (5 years-teen)
Finished measurements ~ approximate 20½” circumference, 7½” length
NOTES: Pattern is written in US terms.
Unless otherwise noted, the hat and eyes are worked in a continuous spiral, do not join rounds. Mark the beginning of each round.
ABBREVIATIONS, SPECIAL STITCHES & TECHNIQUES:
Rnd(s) = round(s)
Ch = chain
Sl st = slip stitch
Sc = single crochet
Hdc = half double crochet
Magic circle/adjustable ring = See tutorial at http://crochetbydarleenhopkins.com/2013/01/23/magic-circle-aka-adjustable-ring-how-to/
Invisible decrease = Invisible decrease should be worked when the right side is facing. Insert hook under front loop of first stitch. Insert hook under front loop of second stitch. Yarn over, pull through 2 loops on hook, yarn over and pull through last 2 loops on hook.
Reverse single crochet (optional) = Without turning work, single crochet in opposite direction, to the right if right-handed, and to the left if left-handed.
HAT
Both Sizes: Green yarn and H hook
Rnd 1) Using magic circle/adjustable ring method, see above, ch 1 then work 8 sc into ring. Tighten.
Rnd 2) 2 Hdc in each sc around. (16 stitches)
Rnd 3) *Hdc in next hdc, 2 hdc in next hdc; repeat from * 7 more times around. (24 stitches)
Check gauge, 2” diameter.
Rnd 4) *Hdc in next 2 hdc, 2 hdc in next hdc; repeat from * 7 more times around. (32 stitches)
Rnd 5) *Hdc in next 3 hdc, 2 hdc in next hdc; repeat from * 7 more times around. (40 stitches)
Check gauge, 3½” diameter.
Rnd 6) *Hdc in next 4 hdc, 2 hdc in next hdc; repeat from * 7 more times around. (48 stitches)
Rnd 7) *Hdc in next 5 hdc, 2 hdc in next hdc; repeat from * 7 more times around. (56 stitches)
Check gauge, 5” diameter.
Small/Medium only
Rnd 8) *Hdc in next 6 hdc, 2 hdc in next hdc; repeat from * 7 more times around. (64 stitches)
(See gauge note) Check gauge, 6” diameter.
Rnds 9-20) *Hdc in next hdc; repeat from * around. (64 stitches)
Rnd 21) *Hdc in next hdc; repeat from * for 60 stitches, sc in next 2 stitches, sl st in last 2 stitches. (64 stitches) Continue to Edging.
Choose 1 of 3 Edgings-
Edging A) Continue with H hook, [sc-ch 3] in each stitch. Break off yarn and work in ends. (64 [sc-ch 3] repeats)
Edging B) Switch to I hook, sl st in each front loop of previous round. Break off yarn and work in ends. (64 stitches)
Edging C) Continue with H hook, ch 1 then reverse sc in each stitch. Break off yarn and work in ends. (64 stitches)
Medium/Large only
Rnd 8) *Hdc in next 6 hdc, 2 hdc in next hdc; repeat from * 7 more times around. (64 stitches)
(See gauge note) Check gauge, 6” diameter.
Rnd 9) Round 9 is a ½ round.* Hdc in next 7 hdc, 2 hdc in next hdc; repeat from * 3 more times around. (36 stitches) Mark as new beginning of round. Check gauge, 6½” diameter.
Rnds 10-23) * Hdc in next hdc; repeat from * around. (68 stitches)
Rnd 24) *Hdc in next hdc; repeat from * for 64 stitches, sc in next 2 stitches, sl st in last 2 stitches. (68 stitches) Continuing to Edging.
Choose 1 of 3 Edgings-
Edging A) Continue with H hook, sc-ch 3 in each stitch. Break off yarn and work in ends. (68 sc-ch 3 repeats)
Edging B) Switch to I hook, sl st in each front loop of previous round. Break off yarn and work in ends. (68 stitches)
Edging C) Continue with H hook, ch 1 then reverse sc in each stitch. Break off yarn and work in ends. (68 stitches)
Both Sizes
EYES (make 2) G hook
Rnd 1) Black yarn-using magic circle/adjustable ring method, see above, ch 1 then work 8 sc into ring, sl st to the first stitch in the round to join. Tighten and break off yarn.
Rnd 2) Join white yarn in any stitch, ch 1 and then 2 sc in each sc around. Sl st to the first stitch in the round to join. (16 stitches) Break off yarn.
Work rounds 3 - 6 in a continuous spiral, do not join rounds. Mark the beginning of each round.
Rnd 3) Join green yarn in any stitch, ch 1 *sc in next sc, 2 sc in next sc; repeat from * 7 more times around. (24 stitches) This is a good point to tie off ends on the inside of the eye.
Rnds 4-6) *Sc in next sc; repeat from * around. (24 stitches)
Switch to F hook
Rnd 7) *Sc in next sc, invisible decrease; repeat from * 7 more times around. (16 stitches)
Rnd 8) Invisible decrease 8 times around. (8 stitches) Stuff eye with poly-fiberfill.
Rnd 9) Invisible decrease 4 times. (4 stitches) Break off yarn leaving a long tail for sewing.
OPTIONAL TONGUE
H hook and red yarn, ch 6.
Rnd 1) Sc in second chain from hook. Sc across then continuing on the opposite side of the same chain, sc across. (10 stitches)
Rnds 2) - 5) Sc in each sc. (10 stitches each round) end with a sl st. Break off yarn leaving a long tail for sewing. If you would like to make a longer tongue, repeat rnds 2 -5 until you reach the desired length.
ASSEMBLY
Using the photos as a guide, attach the eyes. I like to position the eyes toward the front, in between the crown increases, evenly spaced at about round 9 or 10. Also, tack the eyes so they are “looking” forward, not off to the side or up. Stitch the frog’s mouth/tongue on the front of the hat. Either hand stitch or work surface stitches with an H hook. Work in ends as smoothly as possible and then donate the hat :)
Enjoy!

.jpg)

.jpg)
.jpg)

.jpg)
.jpg)


.jpg)


.jpg)
